You may not notice a leaking garbage disposal until you are confronted with a leak that goes down into your cabinet, produces smelly puddle or causes sounds of dripping water. But even at these late stages, it is possible to do a DIY repair to solve the problem. This article will outline the steps you can take to get your garbage disposal in proper working order.
Find the Leak
The first thing you will want to do is find the source of the leak. As a safety precaution, you will want to unplug the disposal and turn the power off at the breaker box before doing so.
Next, insert a sink stopper into the sink drain and wipe the disposal with a clean cloth until it’s dry. Mix a few drops of food coloring with a few cups of water in a container. Then pour the mixture into the sink stopper.
Use a flashlight to search for the escaped drops of colored water. They will most likely be coming from:
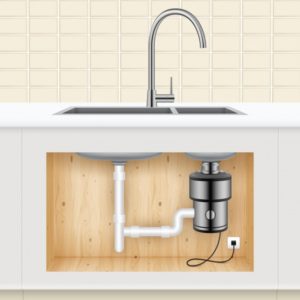
• The top of the disposal, where it meets the sink drain
• The side of the unit where the dishwasher hose or main drainpipe connects to it
• The bottom of the unit
Here’s how to handle each situation.
The Top is Leaking
If the top is leaking, it’s likely that the putty or bolts that seal the metal sink flange inside the sink drain have deteriorated and come loose opening the watertight seal. If this is the case, you must detach the garbage disposal which can be done by systematically loosening and removing the screws and bolts of the system.
Scrape off the existing putty and apply new putty around the top of the flange. Then insert the flange into the sink drain. Reinstall all other parts securely tightening them as you go.
The Side is Leaking
If the side is leaking, you will need to tighten drain line connections and replace worn gaskets. If the leak is on the side where the dishwasher hose meets the disposal’s dishwater inlet, you may need to tighten the screws in the metal clamp connecting them.
If the leak is on the side where the disposal meets the waste drainpipe, loosen the screws that fasten the drainpipe to the disposal and inspect the rubber gasket inside the pipe. If it’s worn out, replace the gasket and re-tighten the drainpipe screws.
The Bottom is Leaking
If the bottom of the disposal is leaking it typically means that:
• At least one seal in the interior shell of the unit that protects the motor has deteriorated or
• The shell is cracked
Both issues are difficult to repair, and you may be better off getting a new unit.
Once you have completed your repair, wipe the unit dry again, unplug the sink drain (if plugged) and run your dyed water through the drain once more. If you don’t see a leak, congratulations. You have successfully repaired your unit and saved yourself a fair amount of money.
If all else fails, call JVS Plumbing Co. today
What DIY plumbing tips do you have to share?